This section describes how to feed and maintain your bin over the several months it will take to generate a significant amount of worm castings. Remember that often it is better to be more hands off than to attempt to control every little factor, as a healthy vermicompost system will keep itself balanced better than an overly fussy operator. If something seems really wrong with your bin, however (bad odors, dead, listless, or escaping worms, or just a sense that things are not quite right), please check our Troubleshooting guide!
Feeding
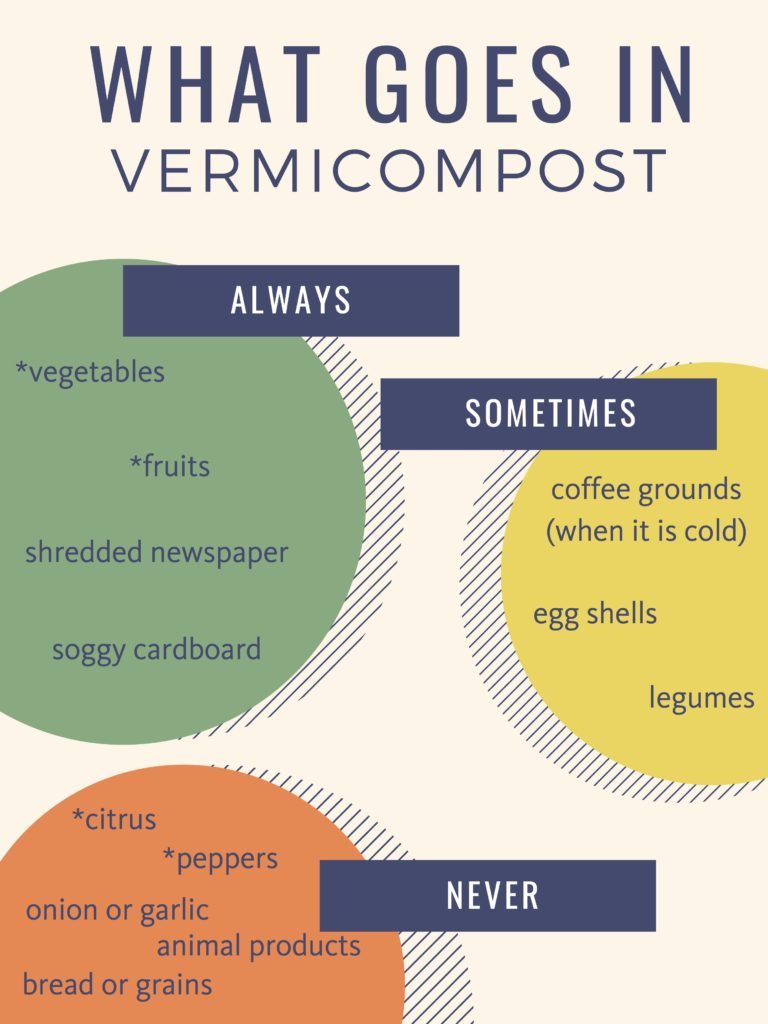
As discussed in the Materials and Setup section, worms require a very specific diet. They will eat fruit and vegetable scraps, but not onions, hot peppers, or citrus. Remember that worms are basically one large mucus membrane, so anything that is painful for your eye is extremely uncomfortable for them. Bread, rice, and beans may ferment in the bin, which can reduce oxygen or cause odors that both you and your worms will dislike. These same foods also tend to mold heavily and while mold is not necessarily dangerous for worms you probably don’t want it in your kitchen. Meat, dairy and oils will cause strong odors, possible pathogens, and can introduce pests. Worms absolutely love melons, cantaloupe, and pumpkin.
Healthy, warm, active worms will eat about half their weight per day. If you start with about 1 lb of worms in a small kitchen bin, expect to feed no more than 3.5 lbs per week. It is perfectly fine to underfeed worms, but very bad to overfeed. If worms cannot eat their food quickly enough it will rot and the oxygen level in the bin will drop (see Troubleshooting) and your worms will die.
Feeding can be done in daily increments or in larger weekly amounts. Do not attempt to feed more than a week’s worth of food at once, as it will rot before the worms can get to it. Never, for example, try to tide your worms over with a large amount of food before going on vacation. They are much better off just going without.
Before you feed, consider pre-treating your food scraps. There are several ways to pre-treat food:
- Chop all food with a knife or in a food processor. Remember that food is broken down by microorganisms which are then eaten by worms; the more finely chopped food waste is the greater the surface area for microbes and the faster they will colonize. The worms, in turn, will process the material much faster.
- Freeze (and then thaw) food. When food is frozen, the water in each cell expands and breaks the cell wall, which speeds up decomposition. Freezing also kills any insect larva that may be in the food.
- Microwave (and then cool) food. Like freezing, microwaving can jump start the decomposition process and can kill any pests that may be present.
- Let food sit before feeding. Many people do this anyway simply because they feed their worms produce that has gone bad, but food that has already started decomposing is that much closer to ideal worm food.
You can either feed your worms food that has been pre-treated using one of the above methods or fresh food (though it will take longer for the worms to start eating). To feed, place food waste in a small pile in one corner of your bin and cover it with a similar volume (though much smaller weight) of shredded newspaper. The newspaper acts as a balancing carbon source and helps keep fruit flies away since flies cannot burrow to the food once it is covered. The next time you feed, you may choose to pick a different corner so that over time each area of the bin is generating castings. When feeding the DPW 10-gallon Rubbermaid bin I feed in a 2-inch wide row at one edge of the bin; I will later push all partially eaten material over by 2 inches to clear a new 2 inch row for the next feeding.
Maintenance
Maintaining a worm bin requires balancing the variables that shape the worm ecosystem:
Moisture and Oxygen
Moisture and Oxygen: These two variables are grouped together because they counteract each other. Worms need plenty of both, but high amounts of moisture (pooled water) will block oxygen flow, and high air flow (vents, fans, or even open or porous bins) will increase evaporation. Balance is key. Make sure that your bin is always consistently moist, like a damp sponge, but never soaked or with standing pools of water. For the most part, the food you give your worms will be very high in water and will provide them with all the moisture they need. If your bin is prone to drying (because your airflow is so excellent!) or if you do not feed often, you may need to occasionally add water. A watering can works fine. How much to add and how often will depend on your unique conditions, so be observant and check on your bin regularly!
Good drainage heavily reduces the risk of too much moisture, but sometimes drains don’t work as well as they should. You can wick away excess water by placing a rolled up paper towel in the bin, one end sitting at the bottom of the bin in the pool and the other extending upward past the top of the food and bedding layers like a chimney. The paper towel will soak up excess water with minimal disturbance to the rest of the bin; simply pull it out once it is fully saturated or the pool is gone. You can also simply add more of an absorbent bedding like shredded newspaper; even when not in direct contact with the moisture it will help the humidity in the bin as a whole reach equilibrium.
The food decomposition process requires a great deal of oxygen. If oxygen levels are low, anaerobic processes will take over and cause chemical reactions and strong odors that will stress or kill your worms and make the bin unpleasant to be around. To keep oxygen high, ensure that your bin has plenty of ventilation either through air holes or porous materials. You can also leave the lid off of your bin temporarily. Make sure to avoid excess moisture (see above) and use plenty of bedding to keep food mixed and fluffed up so it is not matted into a dense layer that blocks all airflow.
For the most part wooden bins breathe better, which improves airflow but makes them more prone to drying. Plastic bins retain water, sometimes in excess, and require more air holes as air cannot flow through the material itself.
Bedding

Bedding: Bedding is a very important component of the vermicomposting systems, and a great deal of problems can be solved simply by adding more bedding. It serves 3 purposes:
- Acts as a carbon source to balance the nitrogen in the food (too much nitrogen will produce ammonia).
- Adds bulk to the bin to prevent matting and increase airflow.
- Absorbs excess moisture.
Some types of bedding can be used for all 3 purposes, others only one or two. Straw and dried leaves, for example, are a great carbon sources and provide bulk, but do not absorb much moisture, whereas shredded cardboard can absorb moisture but doesn’t have much bulk. Shredded newspaper can serve all three needs, and is very easy for the home vermicomposter to find. It’s perfectly fine to use a bedding type that only satisfies one or two criteria, as long as you mix it with another type that covers the missing needs.
A layer of bedding should be added with every feeding. Dried bedding placed on top of food will help prevent flies and can keep the worms from leaving the bin. Be generous with bedding– the chances that you will overdo it are small, and your worms will love it!
Temperature

Temperature: One of the nice things about worm composting is that worms do best in the same temperatures as humans, so they are easy to incorporate into our lives. The red wiggler variety is especially tolerant, surviving in temperatures ranging from 40 – 85 degrees Fahrenheit and thriving at an ideal range of 65 – 77 degrees. Worms will be sluggish at low temperatures and more active when warmer (up to a point). If you keep your worms indoors you are almost guaranteed an ideal temperature range with no extra work on your part. Outdoor bins should be kept in sheltered, shaded areas to minimize swing. Bins that are kept in the sun may heat up to much higher temperatures than the ambient air, especially if they are plastic.
Light
Light: Worms hate light, and will avoid it at all costs. They are very sensitive to UV light, and may be seriously injured or killed if escape is not possible. For this reason, a worm bin must always be completely opaque and should have a lid or thick cover of some kind. You can use light to your advantage, however. Worms have a tendency to try to escape a very new or off-balance bin, but will stay inside if the area just outside the bin is illuminated. Shining a desk lamp at a pile of castings also makes it very easy to separate worms at harvest time as they will simply move away from the light towards the center of the pile and allow the outside to be collected.
After several months of feeding and maintaining your worm bin, you will start to accumulate worm castings. Please see our Harvesting page for instructions on how to separate these castings from your worms for collection. If you’ve read this page and it still seems like things just aren’t quite right in your bin, please check our Troubleshooting guide!
Pingback: Vermicomposting: Materials and Setup | AS Department of Public Worms (DPW)